Retired for a while
Posts: 184 
|
Post by HardRain on Feb 18, 2023 10:46:56 GMT 10
Hi there, everyone. As we know, there aren't many modders/programmers interested in editing PS2 version of RE4 game, if compared to UHD ones. So tools and resources are still very limited. In early January, 2023, I met JADERLINK who is a very talented and persistent guy. I asked him for help about editing 3D .bin models for PS2 version, and since then we've been developing a tool for it, and today I'm gonna try to explain here how it works. Some starting notes:• So far we can already convert any custom 3D .obj model to .bin format, but it will only work 100% on models that does not contain bones, such as room models, inventory models, pickable items, examinable items, key items and etc. It does not have support for skeleton data yet, as it is in development stage; • The project is Open Source, so if you have interest and programming skills in C#, you can contribute by creating a fork; • The current amount of vertices PS2 can handle at once is unknown at the moment, feel free to explore, but keep in mind we're dealing with a quite old hardware. Everything set, let's move.
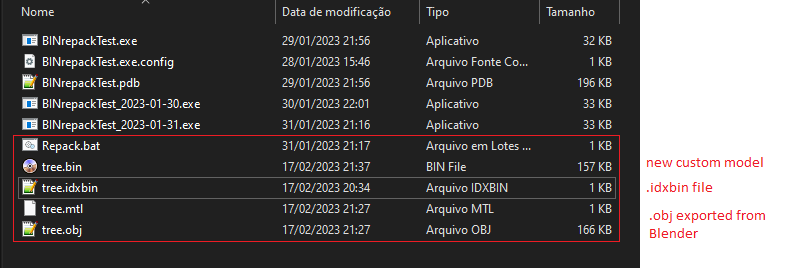
First step - The Model:As .bin format is not 100% documented yet, we simply reuse default header sections.
Choose a model with no bones for reference, I will be using a tree which I extracted from r101 room, you can download it here if you want.
Then now use the BIN decoder (with room .bat file) to convert the model to .obj format so we can see it and edit from any 3D editor (I will be using Blender). It will generate many debug txt files, but we are going to need only the .obj and .idxbin files.
----
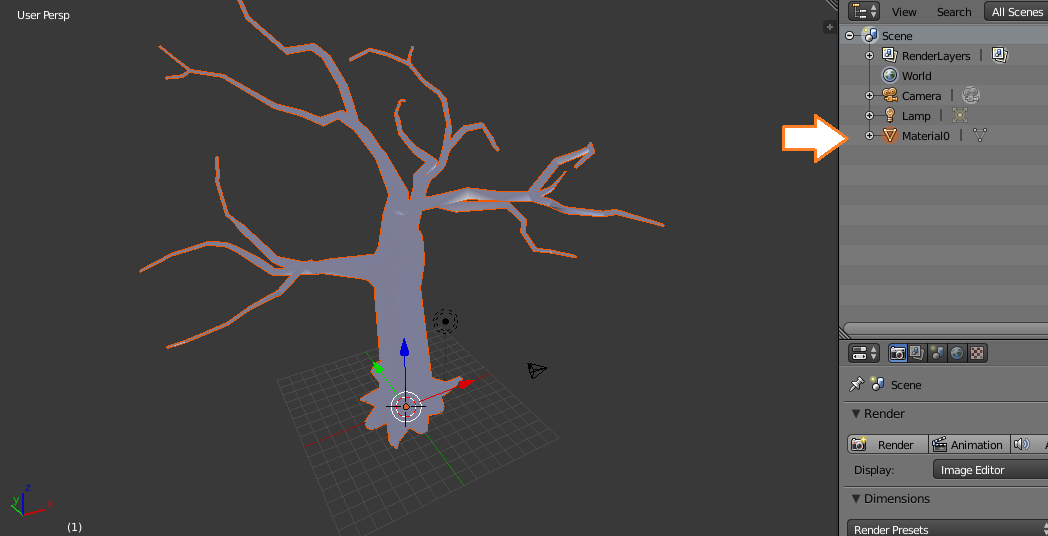
Note that on the outliner exists a object called Material0, the amount of objects in the outliner represents how many textures the model uses, this is very important to note.
Now let's import a custom model to replace the tree, I will be using a Scooter motorcycle, you can download it here if you want.
Scale the model and center it accordingly to where the original model was, then enter on edit mode (Tab shortcut).
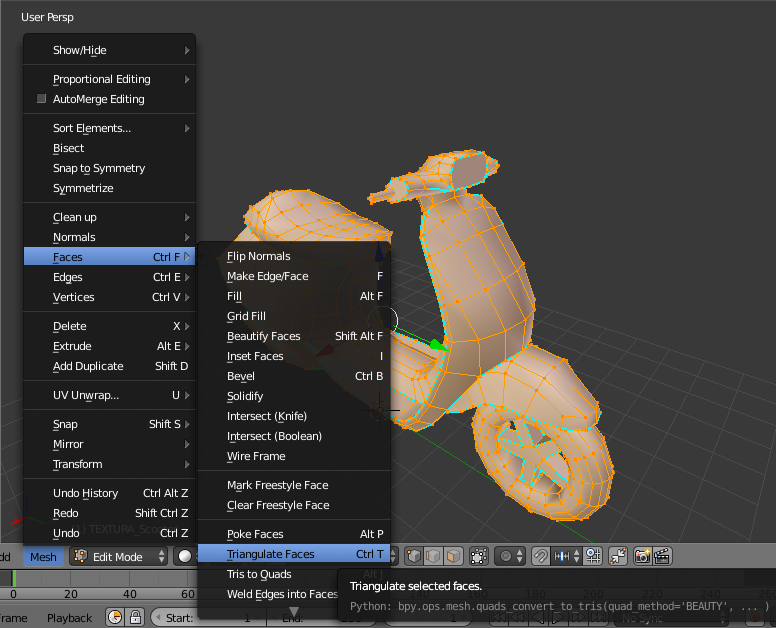
If you notice, the faces are made of squares (quads), but the game only render objects using triangles, so we have two choices: Ctrl + T to triangulate faces now, or checking the box to triangulate faces on .obj export. Choose only one of them.
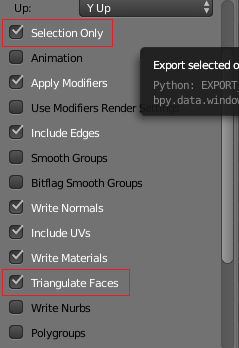
Before exporting, make sure you selected the model you want to export by right clicking on it, and then on export settings check the "Selection Only" box, so only the selected objects will be exported.
Export it directly to the folder where the BIN Repacker is to fasten up the process.
Now we need the .idxbin file mentioned earlier, it is reponsible to create header sections, so move it to the BIN Repacker folder. Make sure your new .obj file has the same name of .idxbin file, then just double click Repack.bat, it will generate a new .bin file for our motorcycle which can already be imported to the game.
That's it for the model, now we need to create the textures on the second step.
|
|
Retired for a while
Posts: 184
|
Post by HardRain on Feb 18, 2023 10:47:42 GMT 10
Second step - The Texture:Textures on PS2 version are only used in .tpl format, so we must convert our model's textures to this format. For this task we have Gif2Tpl tool from St. Vampyre, which converts .gif to .tpl. So open the texture on any image editor, edit it anyway that you want, then invert it vertically and save as .gif format. On my case I also will reduce the resolution from 512x512 to 128x128 so the .tpl file becomes smaller. Note that PS2 cannot handle very well textures bigger than 512px, so some may work and some may not.  Also save this same edited image in .png format because we are gonna need it soon. ---- Move the .gif texture to the folder where GifTpl.exe is located, rename it to input.gif and double click Run.bat. It will compile a .tpl file, and now comes a bit very tricky part. Open the new output.tpl file using a hexadecimal editor and let's edit its header.  These parameters are yet to be fully discovered, I'm not expert on texturing, so I cannot define them very well. But following this image you can try to see if it works for any other SMD models as well. *Resolution base is a parameter which you must use 80 00, 00 01 or higher. If the value is smaller than 80 00, the model's texture is gonna be flickering a lot while moving the camera around it. *Resolution multiplied, this parameter controls how much a texture will be spread around the model, so you must multiply the bigger side by 4x (proportionally by resolution). Example a 256x128 8-bit texture, it must have at least 2048px which is 00 08. 256 > 512 > 1024 > 2048 --- After doing those edits, you must open the output.tpl using Game Graphic Studio, then right-click on it, open the vertically inverted .png texture we saved before, and drag it to replace. Now the texture is ready to be imported with 80 30 DD 05 pattern. To import them back at the game I'm gonna use my SMD tool from the toolset:  If you're familiar with the tool, this will be easy and you can skip this step. But if not, just click on Add New Model and choose the custom .bin model. Then Add New Texture and import our output.tpl file. Afterwards you need to add a new entry on Edit menu, go to the last entry you just added, update Model Number to Total models -1, since it starts counting from zero and we want the last imported model. Then also update texture index on right side, this will be the same as before, 62 on the example because it has a total of 63 textures, so subtract total -1. The last step is to position, rotate and scale the model. Do it as you wish or follow the image example, this will place the Scooter at the beginning of the r100 room. If you did everything correctly, it should appear like this:  And then we're done, congrats. This may seem hard at first, but becomes very easy and fast as we get the hang of it. On the next post I will point out some important things.
|
|
Retired for a while
Posts: 184
|
Post by HardRain on Feb 18, 2023 10:56:28 GMT 10
Notes section
Here I will point out some things about the tool, especially for those who want to collaborate in developing further. Main notesThis was just possible to achieve due to Jaderlink's efforts, he did 90% of the whole thing, while I was focused on researching and testing. --- Model notes• Lacks vertices compression, so every face is generated with 3 vertices which makes the file a bit bigger than needed. To fix this we would need to understand how faces sides are set on .obj file, and then set them on the same side when compiling back to .bin. PS2 uses tristrips technique. • There are a lot of different types of .bin models which has slightly different structures. 1: itm/idm models 2: room models that contains color bytes in normals section 3: room models that contains normals section 4: room models that has the same structure of itm/idm models (rare but exists) 5: models that contains IndexMount always on zero • The tool will also work on models that contains bigger bones structure, but they will not be assigned correctly as .obj does not contain skeleton data. And with that, model parts that were supposed to move/rotate will remain static. I can make a .bin definition/documentation in case someone wants to help to solve any of these issues. --- Texture notes• There are a lot of possibilities in .tpl render configuration, I think we can use non-flipped textures as well with a specific config pattern, more tests are needed to gather up more combinations. But the most commom pattern is 80 30 DD 05, for SMD models and items that uses 128x128 textures. I am also not sure if the pattern should change with bigger/smaller resolution textures, any help with this will be much appreciated. • Try to avoid using too many 512px textures at once if you're modding for PS2 console, but for emulators it should be OK. • After converting .gif to .tpl make sure to open it on GGS and replace with a png texture, since the tool creates the texture semi-transparent.
|
|
Posts: 545 
|
Post by kreed on Feb 18, 2023 11:37:25 GMT 10
Incrivel o nivel de esforço que vocês fazem para o re4 de ps2, não é minha área mas espero que seja muito útil para os outros.
|
|
Retired for a while
Posts: 184
|
Post by HardRain on Feb 18, 2023 13:02:15 GMT 10
Incrivel o nivel de esforço que vocês fazem para o re4 de ps2, não é minha área mas espero que seja muito útil para os outros. Eu estive desejando isso desde o início de 2021 quando iniciei na área de modding, estou feliz demais em ver o que conquistamos ao longo desse tempo. O Jaderlink é um gênio. Obrigado pelo elogio!!
|
|
I am Brazilian, and my language is Portuguese
Posts: 50
|
Post by JADERLINK on Feb 27, 2023 7:01:11 GMT 10
update alfa.1.0.0.1 Translated from Portuguese Brazil: ## BINdecoderTest - The "BINdecoder" class was restructured, now the bin is represented by a class named "BIN"; - A fixed scale of 1000 is no longer used, now the scale present in the .bin file has been found; - Now the bins with "IndexMount" always 0, are correctly extracted to the .obj; - the content of the ".idxbin" file has changed, the "unknown4" tag has been split into parts. and other tags changed their name; - the fields with the names "DrawDistance*" were discovered and named by HardRain, they define the distance that the model can be seen in the scenery. ## BINrepackTest - updated to support the new .idxbin file"; - Added the compression of the vertices, which by default is disabled, which is currently under development, the compression can cause the inversion of some faces in the model. ## Download:github.com/JADERLINK/RE4-PS2-BIN-TOOL/releasesnote: rename the files ".bat.txt" to ".bat"to be able to use the programs. In Portuguese} {spoiler}update alfa.1.0.0.1
## BINdecoderTest
- A classe "BINdecoder" foi restruturado, agora o bin é representado por uma classe de nome "BIN";
- Não é mais usado uma escala fixa de 1000, agora foi encontrado a escala presente no arquivo .bin;
- Agora os bin com "IndexMount" sempre 0, são extraídos corretamente para o .obj; - o conteúdo do arquivo ".idxbin" mudou, a tag "unknown4" foi dividida em partes. e outras tags mudaram de nome;
- os campos com os nomes de "DrawDistance*" foram descobertos e nomeados por HardRain, definem a distancia que o modelo pode ser visto no cenário.
## BINrepackTest
- atualizado para suportar o novo arquivo .idxbin";
- Adicionado a compressão das vértices, que por padrão está desabilitado, que no momento se encontra em desenvolvimento, a compressão pode ocasionar a inversão de algumas faces no modelo.
nota: renomeie os arquivos ".bat.txt" para ".bat" para poder usar os programas.
|
|
|
|
Post by hunk4483 on Apr 18, 2023 0:14:32 GMT 10
Can PS2 RE4 mod PC RE4 weapon models to PS2?
|
|
Retired for a while
Posts: 184
|
Post by HardRain on Apr 18, 2023 8:37:34 GMT 10
Can PS2 RE4 mod PC RE4 weapon models to PS2? Yes, but it is still very experimental, I've successfully swapped the chicago model for a M16 and also changed the rocket launcher. For other guns that have detaching meshes (like reloading clip), things gets harder because there's no support for skeleton data, so rigging must have be done by hexadecimal editing for now, and I don't have that part documented yet, sorry.
|
|
|
|
Post by RobbyJaiel on May 17, 2023 23:10:28 GMT 10
I was successful resize & combine crown into leons head & edit the index, merging the tpl too but somehow it didnt appear in game 
|
|
Retired for a while
Posts: 184
|
Post by HardRain on May 18, 2023 1:10:25 GMT 10
I was successful resize & combine crown into leons head & edit the index, merging the tpl too but somehow it didnt appear in game If it didn't crash the game, then maybe it's something simple to fix, could you upload the plXX.dat file?
|
|
|
|
Post by RobbyJaiel on May 18, 2023 10:19:20 GMT 10
Okay ill send u the file but not here. Turns out in another thread someone stole my mod and post it in social media & probably take advantage in that. Ill leave a link in personal message
|
|
|
|
Post by hunk4483 on May 21, 2023 2:09:23 GMT 10
Who stole your MOD? ?
|
|
|
|
Post by RobbyJaiel on Jul 12, 2023 13:32:30 GMT 10
When i import the custom model should i merge them & rename them into material0, material1, etc or leave them separate ?  Also the texture should i crop each of them or just leave it so it only has one texture 
|
|
|
|
Post by Biohazard4X on Jul 21, 2023 6:48:44 GMT 10
Since this tool dont have Skeleton support, I probably would just merge whole model. I dont think it would matter all the groups will be one BIN and that should be rigged to bone_0 Which should be fine. In short i dont think it would matter.
|
|
Retired for a while
Posts: 184
|
Post by HardRain on Aug 22, 2023 1:50:51 GMT 10
UPDATE 21, august 2023 Thanks to JADERLINK and his persistence, the BIN tool has been updated and now it has skeleton support  And that means we can now import custom characters, weapons, enemies and etc from the internet or port from another version of the game, all you have to do is convert the .bin to .smd using the 1.2.0.0 version, open the .smd in a 3d editor and start rigging your custom model. Then after rigging is done, you'll need to fix the bones order. For that we use this tool made by Son of Persia, it comes with a readme explaining its use. After doing this process, take the _changed.smd, paste it into the bin repack folder, rename to remove the _changed suffix, and then double click on repack using SMD file.bat, after these steps you're just gonna need to update the material indices in case your model uses more than one texture. To update bin material/texture indices, we can use the bin util tool made by myself, then the steps are: open your new custom .bin, then update the texture indices at the table below and save the file.  The indices start at zero, so zero means the bin will read the first texture from its .tpl file, 1 means it will read the second texture and so on. Two examples we have done so far: jaderlink's pl00 model  hardrain's em12 ganado (don jose) ported from re5 hardrain's em12 ganado (don jose) ported from re5Just be aware that just like any other version, we have a polygon count limit which is unknown at the moment, so feel free to experiment and report any errors here at this thread.
|
|


