TUTORIAL Editing the .CAM file through hex
Jul 29, 2021 9:41:54 GMT 10
JADERLINK, Biohazard4X, and 1 more like this
Post by HardRain on Jul 29, 2021 9:41:54 GMT 10
Hi there, guys.
Recently I've been studying and testing the .cam file a lot and got enough knowledge to make it work flawlessly, now we can edit it through HxD to add some static cameras & create new entries, so I decided to share with all of you what I've learned.
Huge thanks to Biohazard4X for helping me a lot in this.

This tutorial will be very lenghty and I will update it eventually, it will be divided into 4 parts:
- Understanding and copying the data
- More in-depth details and fixing errors
- Adding a new camera into our custom CAM
- Inserting new camera into a original CAM
Tools you will need:
Crzosk's Cam Tool
RE4 Level Viewer
HxD
ONE ADVICE: If your PC is powerful enough to run 3DS MAX software, I'd highly suggest you to use it with MarioKart64n Script, because you can do these steps with just a few clicks.
This tutorial is for those who doesn't have a nice PC, 3DS MAX or for those who always likes to learn something new, like me.
-- -- -- -- -- -- -- -- -- -- -- -- -- -- -- -- -- -- -- -- -- -- -- -- -- -- --
*Please make a backup of your original files before any edits
First things first, you need to know how the file structure is built to identify the bytes correctly, take a look at this:
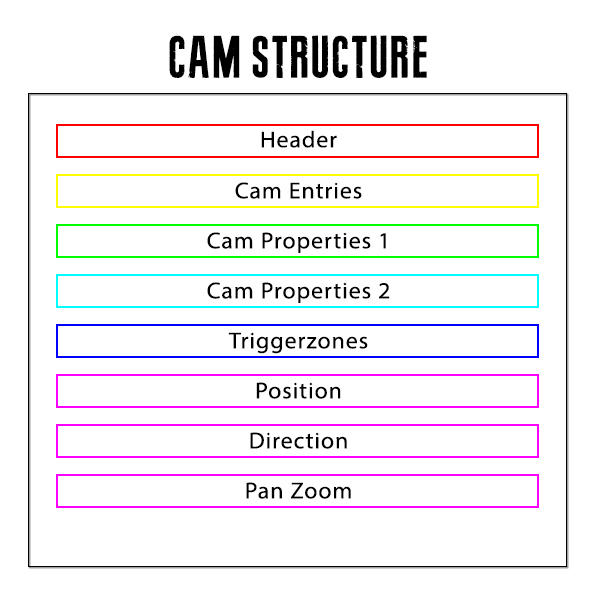
CAM Structure
Header: Contains Index bytes
Cam Entries: Contains triggerzone type, pointers for offsets
Cam Properties 1: Contains LIT Group, triggerzone type, lower limit, higher limit, pointers
Cam Properties 2: Contains Index, camera type, data set, a lot of pointers
Triggerzones: Contains triggerzones in X,Y and Z
Position: Contains camera position
Direction: Contains camera direction (seems like rotation)
PAN Zoom: Contains Field of View
With that being said, I will be using the first room camera for this tutorial, so let's open r100_00.CAM at HxD and analyze it.

Here we can see the start of the structure, with this information we can start creating a new camera from scratch, so press CTRL + N to create a new file on HxD.
After creating the new file, return to the r100_00.CAM tab (you can alternate tabs by pressing CTRL + TAB), copy the header, the very first camera entry and the very first camera properties and paste it at the new file, then you get something like this:

Now let's return to r100_00.CAM to find the rest of the structure.
If you look at the index bytes of the header, you can see a 0F 0F, that value means we have a total of 15 cameras in r100_00.CAM, so with this information you can notice there are 15 entries and, consequently, there will be 15 camera properties.
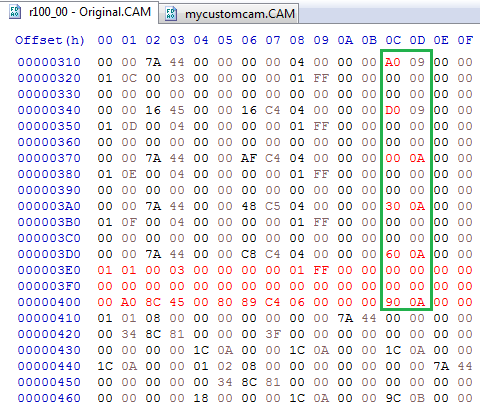
Scroll down by counting the indexes or simply go to offset 3D0 to get to the next structure part, the camera properties 2:

Each camera properties 2 have a lenght of 34 bytes, so let's copy the very first one and paste it below at our custom camera. I will explain everything afterwards, do not worry.
After pasting, now we need the last parts of the structure: triggerzones, position, direction and pan zoom, so let's move.
You can scroll down and go counting the camera properties indexes or simply go to offset 6E0.
Now things will get a bit more complicated, we are in the triggerzone area.
Every triggerzone has a X, Y and Z value, consistent in float values (4 bytes for each X, Y and Z), and the triggerzone can contain 4 or 6 vertexes in total.
To make this easier we can use Crzosk's Cam Tool to identify how many vertexes there are in the triggerzones, so let's open the r100.dat in the tool:

Here you can see the triggerzones vertexes in float values, there are a total of 4 vertexes in this entry, so take a look at the very first one 12,369957.
Go back to the HxD and look at the offset 6EC:

Here you can see, in the float value, that it matches with the value we saw at Crzosk's tool, don't worry about this comma in a different place for now.
With this information we gathered, now we can obtain all the 4 triggerzone vertexes for one entry, so let's copy all the bytes related to this, they are sequential:

If you are unsure if you selected the correct bytes, always use the Crzosk tool for reference.
Here you can see the last float Z value, and we are correct:

- - - - - - - - - - - - - - - - - - - - - - - - - - - - - - - - - - - - - - -
Now we need the last parameters: position, direction and pan zoom.
To find where these parameters starts, we can check the last triggerzone vertex value from the last camera entry, and right after it will be the first position value.
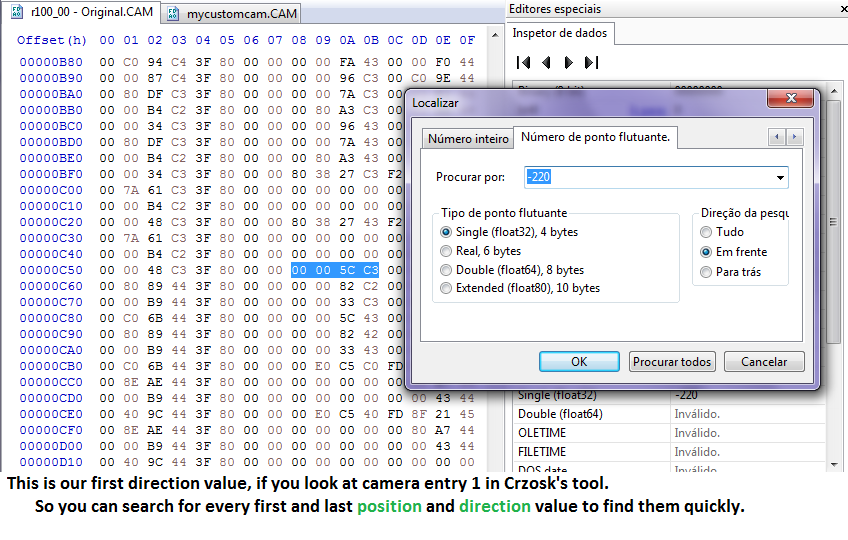
Search for this float Z value:

Then you will get to offset A18, but the position parameter starts at A1C, so go to it.

Here you can see a float value of -527, this is the first position of the camera entry.
You can check it out at Crzosk tool, but remember to change the index because the first camera doesn't have any position or direction values:

And in this image you can see the very first X position, it is -0,527, which is the same value we saw in HxD, so we are in the correct place.
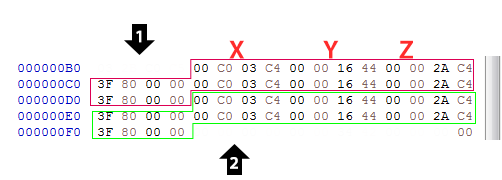
Position and direction are made of X, Y and Z float values just like triggerzones, but they use another float value as a separator between values, which is 3F 80 00 00.
So the data will be like this:
 Position and direction use the same amount of bytes, so that means we can duplicate a position to use it as the direction, let's do it now.
On our custom camera we will only need two slots of both position and direction for the data set, so it will look like this:
Pos 1: XXXXYYYYZZZZ 3F 80 00 00
Pos 2: XXXXYYYYZZZZ 3F 80 00 00
Dir 1: XXXXYYYYZZZZ 3F 80 00 00
Dir 2: XXXXYYYYZZZZ 3F 80 00 00
On easier words, we need to copy just one position from r100_00.CAM and paste it 4 times in our custom camera, just like this:

Now we need only the Pan Zoom, finally.
The Pan Zoom is made of two float values for each data set, you can see it on the Crzosk tool if you want to check it out.
The first float value makes the camera spin in a creative way, the second float value is responsible for Field of View, my favorite.
Since our camera will have a 2 data set, we will need to get 4 Pan Zoom float values.
(I will explain better about this data set in the next post)
For this, we can search the pan zoom in the r100_00.CAM if we want to, but since we already know how they are made, we can easily insert 4 float values and we're done.
Just like this:

Now just press CTRL + S and save it with any name you like, but remember to put .CAM extension at the end, example: mycustomcam.CAM
Done with this part of the tutorial, all the structure have been created and we have successfully created a camera entry from scratch.
However, the camera will not work if you insert it into any room, on the next post I will show you how to fix this and a lot of valuable info.
Recently I've been studying and testing the .cam file a lot and got enough knowledge to make it work flawlessly, now we can edit it through HxD to add some static cameras & create new entries, so I decided to share with all of you what I've learned.
Huge thanks to Biohazard4X for helping me a lot in this.

This tutorial will be very lenghty and I will update it eventually, it will be divided into 4 parts:
- Understanding and copying the data
- More in-depth details and fixing errors
- Adding a new camera into our custom CAM
- Inserting new camera into a original CAM
Tools you will need:
Crzosk's Cam Tool
RE4 Level Viewer
HxD
ONE ADVICE: If your PC is powerful enough to run 3DS MAX software, I'd highly suggest you to use it with MarioKart64n Script, because you can do these steps with just a few clicks.
This tutorial is for those who doesn't have a nice PC, 3DS MAX or for those who always likes to learn something new, like me.
-- -- -- -- -- -- -- -- -- -- -- -- -- -- -- -- -- -- -- -- -- -- -- -- -- -- --
UNDERSTANDING AND COPYING THE DATA
PART 01*Please make a backup of your original files before any edits
First things first, you need to know how the file structure is built to identify the bytes correctly, take a look at this:

CAM Structure
Header: Contains Index bytes
Cam Entries: Contains triggerzone type, pointers for offsets
Cam Properties 1: Contains LIT Group, triggerzone type, lower limit, higher limit, pointers
Cam Properties 2: Contains Index, camera type, data set, a lot of pointers
Triggerzones: Contains triggerzones in X,Y and Z
Position: Contains camera position
Direction: Contains camera direction (seems like rotation)
PAN Zoom: Contains Field of View
With that being said, I will be using the first room camera for this tutorial, so let's open r100_00.CAM at HxD and analyze it.

Here we can see the start of the structure, with this information we can start creating a new camera from scratch, so press CTRL + N to create a new file on HxD.
After creating the new file, return to the r100_00.CAM tab (you can alternate tabs by pressing CTRL + TAB), copy the header, the very first camera entry and the very first camera properties and paste it at the new file, then you get something like this:

Now let's return to r100_00.CAM to find the rest of the structure.
If you look at the index bytes of the header, you can see a 0F 0F, that value means we have a total of 15 cameras in r100_00.CAM, so with this information you can notice there are 15 entries and, consequently, there will be 15 camera properties.
Scroll down by counting the indexes or simply go to offset 3D0 to get to the next structure part, the camera properties 2:

Each camera properties 2 have a lenght of 34 bytes, so let's copy the very first one and paste it below at our custom camera. I will explain everything afterwards, do not worry.
After pasting, now we need the last parts of the structure: triggerzones, position, direction and pan zoom, so let's move.
You can scroll down and go counting the camera properties indexes or simply go to offset 6E0.
Now things will get a bit more complicated, we are in the triggerzone area.
Every triggerzone has a X, Y and Z value, consistent in float values (4 bytes for each X, Y and Z), and the triggerzone can contain 4 or 6 vertexes in total.
To make this easier we can use Crzosk's Cam Tool to identify how many vertexes there are in the triggerzones, so let's open the r100.dat in the tool:

Here you can see the triggerzones vertexes in float values, there are a total of 4 vertexes in this entry, so take a look at the very first one 12,369957.
Go back to the HxD and look at the offset 6EC:

Here you can see, in the float value, that it matches with the value we saw at Crzosk's tool, don't worry about this comma in a different place for now.
With this information we gathered, now we can obtain all the 4 triggerzone vertexes for one entry, so let's copy all the bytes related to this, they are sequential:

If you are unsure if you selected the correct bytes, always use the Crzosk tool for reference.
Here you can see the last float Z value, and we are correct:

- - - - - - - - - - - - - - - - - - - - - - - - - - - - - - - - - - - - - - -
Now we need the last parameters: position, direction and pan zoom.
To find where these parameters starts, we can check the last triggerzone vertex value from the last camera entry, and right after it will be the first position value.
Search for this float Z value:

Then you will get to offset A18, but the position parameter starts at A1C, so go to it.

Here you can see a float value of -527, this is the first position of the camera entry.
You can check it out at Crzosk tool, but remember to change the index because the first camera doesn't have any position or direction values:

And in this image you can see the very first X position, it is -0,527, which is the same value we saw in HxD, so we are in the correct place.
Position and direction are made of X, Y and Z float values just like triggerzones, but they use another float value as a separator between values, which is 3F 80 00 00.
So the data will be like this:

On our custom camera we will only need two slots of both position and direction for the data set, so it will look like this:
Pos 1: XXXXYYYYZZZZ 3F 80 00 00
Pos 2: XXXXYYYYZZZZ 3F 80 00 00
Dir 1: XXXXYYYYZZZZ 3F 80 00 00
Dir 2: XXXXYYYYZZZZ 3F 80 00 00
On easier words, we need to copy just one position from r100_00.CAM and paste it 4 times in our custom camera, just like this:

Now we need only the Pan Zoom, finally.
The Pan Zoom is made of two float values for each data set, you can see it on the Crzosk tool if you want to check it out.
The first float value makes the camera spin in a creative way, the second float value is responsible for Field of View, my favorite.
Since our camera will have a 2 data set, we will need to get 4 Pan Zoom float values.
(I will explain better about this data set in the next post)
For this, we can search the pan zoom in the r100_00.CAM if we want to, but since we already know how they are made, we can easily insert 4 float values and we're done.
Just like this:

Now just press CTRL + S and save it with any name you like, but remember to put .CAM extension at the end, example: mycustomcam.CAM
Done with this part of the tutorial, all the structure have been created and we have successfully created a camera entry from scratch.
However, the camera will not work if you insert it into any room, on the next post I will show you how to fix this and a lot of valuable info.


