


TUTORIAL How to edit cutscenes (PS2)
Apr 13, 2022 14:57:04 GMT 10
Mr.Curious, Biohazard4X, and 2 more like this
Post by HardRain on Apr 13, 2022 14:57:04 GMT 10
Hey there, guys.
Now I'm here to share with you some more knowledge about editing cutscenes in RE4 PS2 version.
I have created a similar thread about converting these files, but now we are able to import them back to the game, so I decided to create this new thread.
In the PS2 version of the game, the cutscenes are made of files in .sfd format, which is a video file format created by Sofdec that is packed with two separated files: .m1v file which is an older version of MP4 for the movie itself, and a .sfa (Sofdec Audio) for the audio.
So, for us to edit the cutscenes we must extract and convert these files to a more compatible format recognized by editors.
We will need these tools below, please download them.
sfd2mpg
SEGA Dreamcast Movie Creator
Extracting the contents from a .sfd file
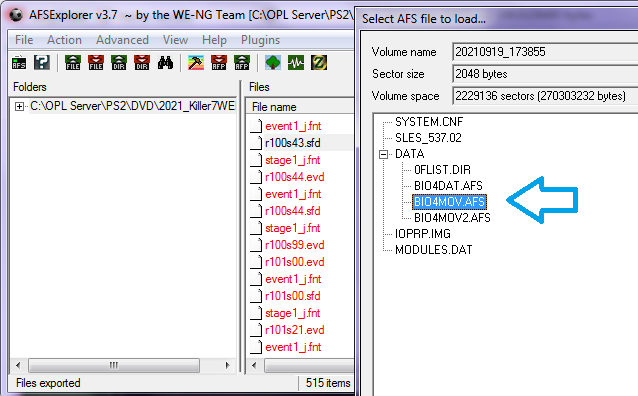
The game cutscenes are in the bio4mov.afs file, so choose one of them to extract, I will be using the first ganado cabin cutscene which is r100s03.sfd.
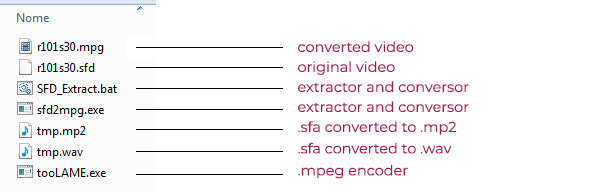
Move the .sfd file to the sfd2mpg folder and double click on SFD_Extract and then it will extract and convert both video and audio files automatically. Video will have .mpeg extension and a .wav for the audio.
-
Editing the video
In this step you can use any video editor you like the most, I use VSDC as it's free and easy to use.
NOTE: You must pay close attention when editing the video, because the PS2 uses default video parameters which are recommended to follow up, I will list them right here:
Resolution: 512x336px (yeah, very tiny)
FPS: 29.970 or 30 (not tested yet with 60fps)
Sound: 44khz, Stereo
-

-
I have tested with different resolutions and it made the game crash, although I was using a different aspect ratio, so more testing is needed for this.
About the duration, I have also not tested yet, but I think we are able to extend or lower it.
I will not cover editing process since it is a very personal step, you can start by testing simple edits like adding subtitles and color correction, then save it.
After editing the video you must do the following steps:
- Export the edited video to .avi format WITHOUT sound (mute)
- Export it again in .avi format WITH sound
Then you'll need to extract the sound from your edited video, or simply convert it to a sound file (it must be .wav extension). For this step I use this website for quick converting .avi to .wav

After doing that, make sure you installed the Sega Dreamcast Movie Creator 'cause we need it in the next steps.
Converting custom cutscene back to .sfd
Now open the Movie Creator tool and select your video without sound and the separated .wav file, import them to Material Files and uncheck the "Use identical files" option.
Rename the Output file name if you want, make sure it is selected to output in .sfd format, double check all other parameters just like in the pic:

If everything seems okay, click on Start Encoding. It will convert the .avi to .m1v and the .wav to .sfa and then join them to a new .sfd file.
Create a backup file in case something goes wrong.
After the processing is done, you should simply import it back to the AFS and test in game, but make sure you have enough free space for the file, as it will be bigger than before (lacks compression)...
If you followed step by step, it should work nicely.

Therefore, I highly encourage you to make more a lot of more tests and complement here in this thread if you want. You can try to upscale x2 the video resolution (512x336 to 1024x672), 60 fps, and change the Movie Creator advanced settings, there are a lot yet to explore.
I hope I helped you with this quick guide.
Now I'm here to share with you some more knowledge about editing cutscenes in RE4 PS2 version.
I have created a similar thread about converting these files, but now we are able to import them back to the game, so I decided to create this new thread.
In the PS2 version of the game, the cutscenes are made of files in .sfd format, which is a video file format created by Sofdec that is packed with two separated files: .m1v file which is an older version of MP4 for the movie itself, and a .sfa (Sofdec Audio) for the audio.
So, for us to edit the cutscenes we must extract and convert these files to a more compatible format recognized by editors.
We will need these tools below, please download them.
sfd2mpg
SEGA Dreamcast Movie Creator
Extracting the contents from a .sfd file
The game cutscenes are in the bio4mov.afs file, so choose one of them to extract, I will be using the first ganado cabin cutscene which is r100s03.sfd.
Move the .sfd file to the sfd2mpg folder and double click on SFD_Extract and then it will extract and convert both video and audio files automatically. Video will have .mpeg extension and a .wav for the audio.
-
Editing the video
In this step you can use any video editor you like the most, I use VSDC as it's free and easy to use.
NOTE: You must pay close attention when editing the video, because the PS2 uses default video parameters which are recommended to follow up, I will list them right here:
Resolution: 512x336px (yeah, very tiny)
FPS: 29.970 or 30 (not tested yet with 60fps)
Sound: 44khz, Stereo
-
-
I have tested with different resolutions and it made the game crash, although I was using a different aspect ratio, so more testing is needed for this.
About the duration, I have also not tested yet, but I think we are able to extend or lower it.
I will not cover editing process since it is a very personal step, you can start by testing simple edits like adding subtitles and color correction, then save it.
After editing the video you must do the following steps:
- Export the edited video to .avi format WITHOUT sound (mute)
- Export it again in .avi format WITH sound
Then you'll need to extract the sound from your edited video, or simply convert it to a sound file (it must be .wav extension). For this step I use this website for quick converting .avi to .wav
After doing that, make sure you installed the Sega Dreamcast Movie Creator 'cause we need it in the next steps.
Converting custom cutscene back to .sfd
Now open the Movie Creator tool and select your video without sound and the separated .wav file, import them to Material Files and uncheck the "Use identical files" option.
Rename the Output file name if you want, make sure it is selected to output in .sfd format, double check all other parameters just like in the pic:
If everything seems okay, click on Start Encoding. It will convert the .avi to .m1v and the .wav to .sfa and then join them to a new .sfd file.
Create a backup file in case something goes wrong.
After the processing is done, you should simply import it back to the AFS and test in game, but make sure you have enough free space for the file, as it will be bigger than before (lacks compression)...
If you followed step by step, it should work nicely.
Therefore, I highly encourage you to make more a lot of more tests and complement here in this thread if you want. You can try to upscale x2 the video resolution (512x336 to 1024x672), 60 fps, and change the Movie Creator advanced settings, there are a lot yet to explore.
I hope I helped you with this quick guide.


