TUTORIAL How to modify sounds effects in the .snd file (PS2)
Jun 3, 2021 4:21:16 GMT 10
tomazm and Biohazard4X like this
Post by HardRain on Jun 3, 2021 4:21:16 GMT 10
**Note: this tutorial is very outdated, please follow this one instead
Hi there, guys.
I have been digging and searching for weeks for some information about this misterious file, the .snd.
There are only a few tips around the internet on how it works, it has so many different ways of using, like even being used for text only, they call it a "generic file type", but I finally got the hang of it.
I've seen some guys who also got this working, but they decided not to share, so it gave me even morerage enthusiasm to keep on trying and discover all by myself, and I told to myself I would be sharing with you guys when I find the solution, and here I am.
-
Now, let me explain a little about this file.
This file, on the PS2, has a different behavior if compared to the .snd file contained in the PC 2007 version, it is not only used for text or as a reference, but it really contains the sound files inside of it. They are compressed in what we call ADPCM (Adaptive Differential Pulse-Code Modulation), and it contains several .wav (or .vag) files inside of it, listed with a numerical value to play in a specific order when the game calls the sound function (like binaries 1 or 0, active or inactive).
So, for us to hear these compressed audios, we need to know the correct Hertz frequency that is used in the PS2 games, which is something around 22050Hz. We also need to always play them in mono channel, so it does not get tone pitched up. (may work different in some games).
-
Enough with the talking, let's get a hand on it.
Now your question should be: how can we hear, extract, edit and import the .wav sounds?
For this we will need some tools, download all of them right here (they are all free):
MFAudio 1.1
Audacity
PSound
HxD (maybe you already have this one)
PART 01
**Before any changes, make sure to create a backup file for the .snd you'll be editing.
**This tutorial will only work with PlayStation 2 version
**PLEASE, make sure to read the UPDATE post below, as it will fix many errors in this tutorial.
After installing the tools, let's open up the MFAudio, and it will show something like this:

Let's click on Open and select the .snd file we would like to change the sound:
(if you do not know how to extract the .snd file from the game, just let me know and I will explain it)

I will be using wep09.snd, which is the brown Rifle sounds.
If you want to follow up 100% what I'm doing, you can use the same file as me, download it here:
wep09
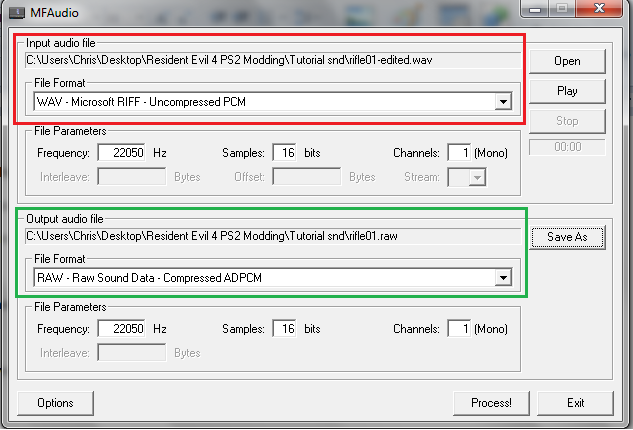
When we add the .snd file to the tool, it will show us all of these parameters above, I now will explain what they mean:
Red box: show us the sound type of the .snd file, which is RAW and ADPCM (like I explained above).
Yellow boxes: show us the sound frequency it will be played/extracted, as standard it comes with 44100Hz, but the sounds will only work at 22050Hz, so change them to 22050.
Orange boxes: show us how in many channels the sound will be played, stereo doesn't seem to work with the files I tested, so change the values to 1, which means mono.
Blue box: show us the file extension type we want to extract, there are a lot of options in there, but in this tutorial we will be using .wav, so change it to WAV.
Do not worry about interleave, it is used only for stereo sounds so the option will be greyed out.
Then you'll get something like this:

After that, click on PLAY button and listen to the sound, it will be very short.
If you're using the same file as me, you will notice that it is the sound of the Rifle shooting, so that's a good start.
But now you're gonna ask me: and where the hell are the other sounds, like aiming and reloading?
Well, for that we need to understand the last and most important parameter on the MFAudio, the Offset.
Maybe this word reminds you of something, if you're familiar with HxD.
So yeah, that's exactly what it means.
The offset parameter tell us the position/address the sound will start playing, and it will stop when it finds a 15 bytes (0F) row of zeroes in the file.
Got a little confused? So let's open up the wep09.snd file with HxD software.

See the offset in the left side?
So let's scroll down to the same Offset value we saw in the MFAudio tool, which is A30 (see it again the pictures above).
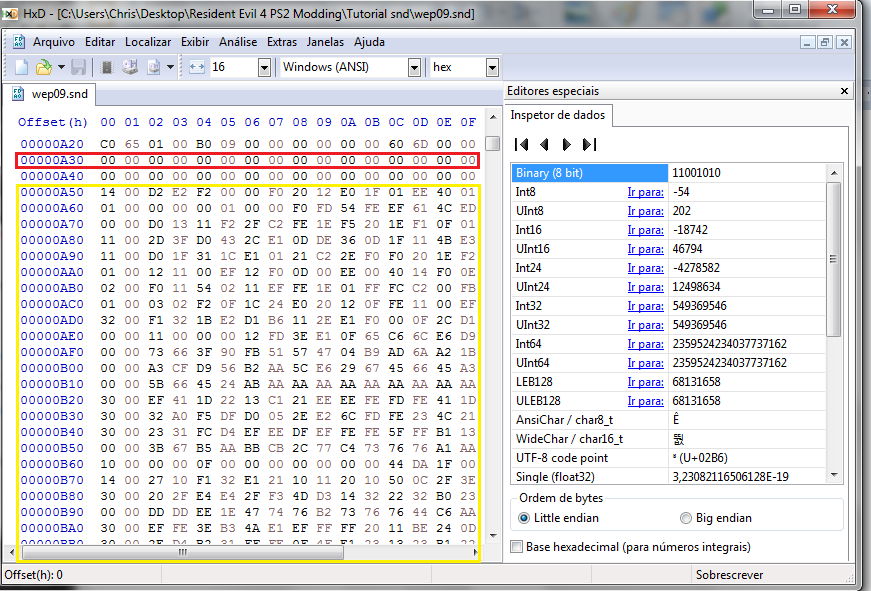
As I said above, a row of 15 bytes of zeroes means when the sound will stop playing, but in this case, since it is the first sound we can hear, it will mean when the sound will begin to play.
So all the bytes in the yellow box are that shooting sound you just heard in the MFAudio tool.
(Its size is bigger than showed up in the picture, I will explain about it now).
For us to find the whole bytes which envolves the shooting sound, we need to search for another row of 15 bytes of zeroes.
So press Ctrl + F and search for 00 00 00 00 00 00 00 00 00 00 00 00 00 00 00, in the hexadecimal option:

- - - - -

After that you will see the value we searched for, which means end of first sound.
The yellow box show us the last bytes of the shooting sound we heard, so it is correct.
The orange box show us the start of the next sound contained in the .snd file, which will be our second sound.
Want to hear it?
So, take a look at the offset which starts the next sound, it is 5C00.
Let's return to MFAudio and put 5C00 in the Offset parameter, and press PLAY.
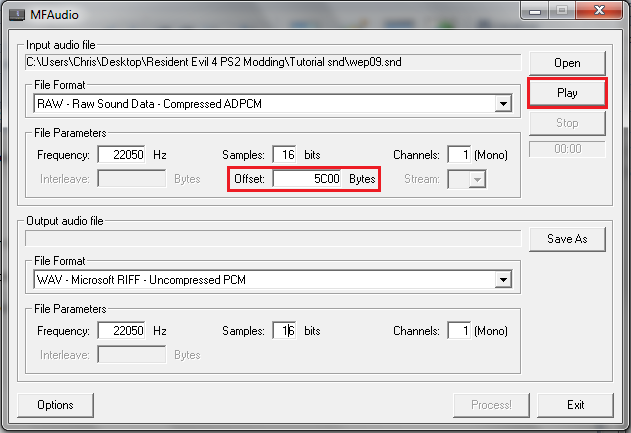
What in earth's name? It is the same sound?
If you're using the same wep09.snd as me, you'll notice this second sound you've just heard is a similar sound of the first one, it is used to create a fake stereo sound, so when you shoot with the Rifle, you are hearing two sounds at once (one for each side L & R). That was the technology back then used by the developers, smart and funny I think.
That means if you want to change the rifle shooting sound, you're gonna need to change these two sounds.
- - -
Go and see for yourself if you want to check out the next sounds, using the 15 bytes method.
Done with identifying these offset values, let's head over and modify the shooting sound.
Hi there, guys.
I have been digging and searching for weeks for some information about this misterious file, the .snd.
There are only a few tips around the internet on how it works, it has so many different ways of using, like even being used for text only, they call it a "generic file type", but I finally got the hang of it.
I've seen some guys who also got this working, but they decided not to share, so it gave me even more
-
Now, let me explain a little about this file.
This file, on the PS2, has a different behavior if compared to the .snd file contained in the PC 2007 version, it is not only used for text or as a reference, but it really contains the sound files inside of it. They are compressed in what we call ADPCM (Adaptive Differential Pulse-Code Modulation), and it contains several .wav (or .vag) files inside of it, listed with a numerical value to play in a specific order when the game calls the sound function (like binaries 1 or 0, active or inactive).
So, for us to hear these compressed audios, we need to know the correct Hertz frequency that is used in the PS2 games, which is something around 22050Hz. We also need to always play them in mono channel, so it does not get tone pitched up. (may work different in some games).
-
Enough with the talking, let's get a hand on it.
Now your question should be: how can we hear, extract, edit and import the .wav sounds?
For this we will need some tools, download all of them right here (they are all free):
MFAudio 1.1
Audacity
PSound
HxD (maybe you already have this one)
PART 01
**Before any changes, make sure to create a backup file for the .snd you'll be editing.
**This tutorial will only work with PlayStation 2 version
**PLEASE, make sure to read the UPDATE post below, as it will fix many errors in this tutorial.
After installing the tools, let's open up the MFAudio, and it will show something like this:
Let's click on Open and select the .snd file we would like to change the sound:
(if you do not know how to extract the .snd file from the game, just let me know and I will explain it)
I will be using wep09.snd, which is the brown Rifle sounds.
If you want to follow up 100% what I'm doing, you can use the same file as me, download it here:
wep09
When we add the .snd file to the tool, it will show us all of these parameters above, I now will explain what they mean:
Red box: show us the sound type of the .snd file, which is RAW and ADPCM (like I explained above).
Yellow boxes: show us the sound frequency it will be played/extracted, as standard it comes with 44100Hz, but the sounds will only work at 22050Hz, so change them to 22050.
Orange boxes: show us how in many channels the sound will be played, stereo doesn't seem to work with the files I tested, so change the values to 1, which means mono.
Blue box: show us the file extension type we want to extract, there are a lot of options in there, but in this tutorial we will be using .wav, so change it to WAV.
Do not worry about interleave, it is used only for stereo sounds so the option will be greyed out.
Then you'll get something like this:
After that, click on PLAY button and listen to the sound, it will be very short.
If you're using the same file as me, you will notice that it is the sound of the Rifle shooting, so that's a good start.
But now you're gonna ask me: and where the hell are the other sounds, like aiming and reloading?
Well, for that we need to understand the last and most important parameter on the MFAudio, the Offset.
Maybe this word reminds you of something, if you're familiar with HxD.
So yeah, that's exactly what it means.
The offset parameter tell us the position/address the sound will start playing, and it will stop when it finds a 15 bytes (0F) row of zeroes in the file.
Got a little confused? So let's open up the wep09.snd file with HxD software.
See the offset in the left side?
So let's scroll down to the same Offset value we saw in the MFAudio tool, which is A30 (see it again the pictures above).
As I said above, a row of 15 bytes of zeroes means when the sound will stop playing, but in this case, since it is the first sound we can hear, it will mean when the sound will begin to play.
So all the bytes in the yellow box are that shooting sound you just heard in the MFAudio tool.
(Its size is bigger than showed up in the picture, I will explain about it now).
For us to find the whole bytes which envolves the shooting sound, we need to search for another row of 15 bytes of zeroes.
So press Ctrl + F and search for 00 00 00 00 00 00 00 00 00 00 00 00 00 00 00, in the hexadecimal option:
- - - - -
After that you will see the value we searched for, which means end of first sound.
The yellow box show us the last bytes of the shooting sound we heard, so it is correct.
The orange box show us the start of the next sound contained in the .snd file, which will be our second sound.
Want to hear it?
So, take a look at the offset which starts the next sound, it is 5C00.
Let's return to MFAudio and put 5C00 in the Offset parameter, and press PLAY.
What in earth's name? It is the same sound?
If you're using the same wep09.snd as me, you'll notice this second sound you've just heard is a similar sound of the first one, it is used to create a fake stereo sound, so when you shoot with the Rifle, you are hearing two sounds at once (one for each side L & R). That was the technology back then used by the developers, smart and funny I think.
That means if you want to change the rifle shooting sound, you're gonna need to change these two sounds.
- - -
Go and see for yourself if you want to check out the next sounds, using the 15 bytes method.
Done with identifying these offset values, let's head over and modify the shooting sound.